
AWS Cost Optimization and Project Tracking Made Easy
Jainam KothariMarch 13, 2026
Share this article


Let AI highlight what matters.
Confusion hits fast when the AWS Cost Explorer loads up. You’re not the only one overwhelmed by what appears next. A flood of services pops into view, none playing by the same rules. Each carries a different price tag, measured in odd units, billed on separate schedules. Most groups aren’t asking simply about last month’s total. Their real curiosity digs deeper, into specifics. What parts cost what? Which project quietly drains funds?
Here’s when project-based cost tracking steps in — it fills the gap between what the AWS system displays and the details you really need.
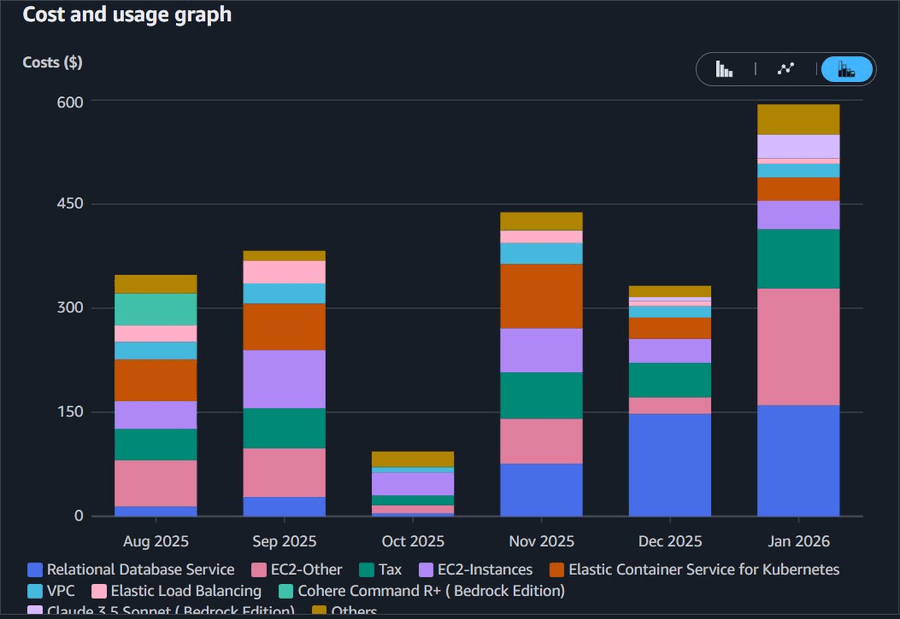
AWS Cost Explorer — Monthly Spend by Service
One thing happens when teams run multiple products under a single AWS account: spending mixes together. Each tool charges separately, EC2 here, RDS there, S3 somewhere else, Lambda too. Billing follows what runs, not which project it belongs to. Without extra setup, everything piles into one pot. Three apps might share space, yet their expenses never sort themselves out. Charges stack up as separate items, but they do not group by purpose.
This causes actual headaches. Without clear tracking, finance teams struggle to link cloud expenses to specific departments. Product leaders find it hard to spot which service is eating up more budget over time. When bills suddenly jump, figuring out why plays out like searching in the dark.
Not knowing isn’t the issue. The way things are set up causes the trouble. You get numbers from AWS, context doesn’t come with them.
Fixing this issue works best when tags stay uniform across everything. With AWS, nearly all resources — like EC2 machines, RDS setups, Lambda tasks, and S3 storage, can carry small bits of labeled info. Try using labels such as Project: payments-api or Team: data-platform; they seem basic, yet reshape entirely how cost reports break down.
After tagging is set up and cost allocation tags turned on inside the Billing console, AWS Cost Explorer can sort expenses using those labels. Instead of staring at one big $12,000 EC2 charge, you see it broken down: $4,200 tied to internal tools, $5,600 linked to live APIs, then $2,200 assigned to testing setups. The full amount stays unchanged, just clearer now.
Having that talk means stepping into new territory with your group or the people involved.

AWS Resource Tags on EC2 Instance in Management Console
Also Read: How Artificial Intelligence Is Revolutionizing Software Delivery?
A system of labels makes sense only when used the same way every time. Try this approach to begin with:
Exactly what you call each tag isn’t the main point, staying consistent matters more. Choose a way of naming them, write it down, make sure everyone follows. Tools such as Terraform or AWS CloudFormation help by setting standard tags right in the setup, either across accounts or within modules, so every resource gets labeled without fail.
With tags set up, two parts of AWS start working better right away. One of those is Cost Allocation Reports — found in the Billing section. Open that area to turn them on. Each month, these reports split expenses out clearly based on how you tagged things. You can send them straight to an S3 bucket. From there, tools such as Amazon QuickSight might pull in the data later.
Another option is AWS Budgets. Instead of just watching overall costs, try focusing on individual tags. Imagine the payments-api effort needs to stay under six thousand dollars each month. That limit can trigger warnings once usage reaches eight tenths of the cap. The person in charge gets a message while there is still time to adjust — well ahead of any deadline.
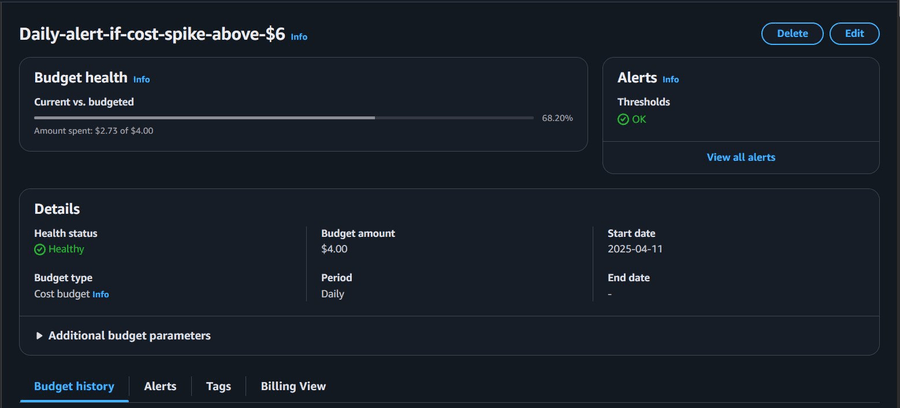
AWS Budgets — per-project spend limits with threshold alerts
One reason some expanding businesses go for multiple accounts? They assign one AWS account per project, group, or stage of work. It just works better when tracking expenses at the project level — since each account draws its own financial line in the sand.
Billing gets simpler when multiple accounts show up under one view, yet stay split behind the scenes. With tagging turned on inside individual setups, oversight becomes clearer from above, at the same time revealing fine points below.
AWS Organizations — Consolidated Billing Across Multiple Accounts
Read Also : Step-by-Step Guide: Migrate an Azure SQL Database to AWS RDS
Figuring out AWS costs can be messy since the dashboard shows things by service pricing, not your team’s workflow. Because of this mismatch, clarity comes only when labels are applied the same way every time across resources. Budgets need clear boundaries matching real projects, not just tech categories. Checking spending often, tied directly to work initiatives, slowly makes patterns easier to spot. Without these steps, numbers stay scattered and hard to trust.
Here’s what works: everything you need already exists. No outside software required just yet. Start with clear labels, turn on tracking features, then set focused spending limits. These steps bring clarity, helping teams see exactly where cloud funds flow, also spotting spots better left untouched.
Tiny steps first. Pick just one project, apply a tag every time, turn on the cost allocation setting. Then sit with Cost Explorer for about fifteen minutes, watch what shows up. When the pattern clicks at this level, rolling it out everywhere in AWS feels lighter somehow. Scale grows naturally from there.
 Jainam Kothari
DevOps Engineer | Passionate about exploring new technologies, cloud infrastructure, and automation. I enjoy working with AWS and continuously learning in the DevOps space.
We’re ISO/IEC 27001:2022 certified, ensuring your projects are executed with globally recognized security standards.
INDIA