
Simpler way to Integrate Razorpay with web application: Technical Guide
Raj VasaniyaOctober 27, 2025
Share this article


Let AI highlight what matters.
In today’s world, it is very common to build a web application integrated with payment gateway. However, it is equally important that payment functionalities are secured, verifiable and trustable.
In India, Razorpay is providing simpler and quicker solution to integrate the payment gateway. It has wide range of options for that including secured set of APIs and SDK. Though improper or incomplete integration leads to various issues like auto refunds, incorrect payment states or security vulnerabilities.
This guide is going to provide complete, end-to-end information on integrating Razorpay using the Razorpay Web standard Checkout with correct sequence, server responsibilities, webhook setup, and common challenges
A successful Razorpay integration follows a specific sequence of steps. The goal is to ensure that every transaction is tied to a unique order, securely captured, and verified through server-side events.
The typical payment flow should be:
This ensures that Razorpay can correctly capture the transaction and associate it with an order on your backend.
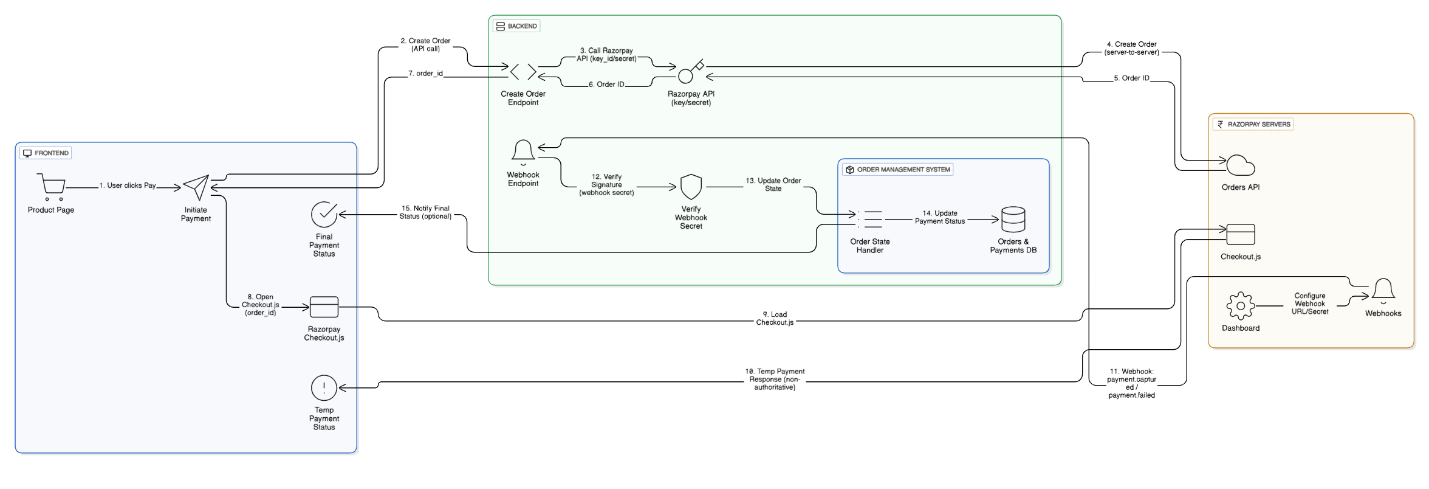
One of the most critical steps in Razorpay integration is creating the order server-side, not on the client.
When you create an order, you must authenticate using Razorpay’s key id and key secret. These can be generated from Razorpay Dashboard. Please note, key id and key secret will be different for test and Live mode.
Please note, that key id and key secret are never added in client-side code or in browser memory. It will pose serious security risk.
In addition, Razorpay requires a valid order for payment capture. If a transaction is attempted without an associated order, Razorpay may temporarily authorize it but automatically refund it later because it cannot be properly captured.
Each order can have only one successful transaction, but failed attempts can be retried until the order expires. This order-based approach ensures traceability and prevents duplicate charges.
Razorpay offers two modes of payment capture:
Auto capture is generally recommended for most integrations unless your business model requires otherwise.
Client-side callbacks from the Razorpay Checkout (such as success or failure messages) should never be relied upon or considered as final word.
Browser callbacks can be blocked, interrupted or (for example, if a user loses internet connection after payment) or even compromised by malicious users.
Instead, Razorpay provides webhooks — server-to-server notifications that confirm payment status directly from Razorpay’s infrastructure to yours. These events are reliable, tamper-proof, and include cryptographic verification.
A webhook is an HTTP call triggered from Razorpay in case of occurring specific event. For an example, when payment is successfully captured or failed, an HTTP call will be triggered. This is reliable source of information as it is originated directly from Razorpay server.
You can configure webhooks through the Razorpay Dashboard. During setup, you must specify:
Each webhook sent by Razorpay includes a signature header (X-Razorpay-Signature). This signature is generated using your webhook secret via HMAC SHA256 hashing.
It is very much important that signature is verified before server start processing the payment details. This makes sure that evet is genuinely coming from Razorpay.
If signature is not verified then server must not process the request and reject it immediately.
Each event you subscribe to — such as payment.captured or payment.failed — should be handled separately on your backend.
For example:
It’s critical to understand each event type before you start implementation.
Two important characteristics of Razorpay webhooks must be understood clearly:
To handle this, your backend should store and compare the current status of the transaction before updating it. This prevents situations where a successful payment is mistakenly overwritten by a later “failed” event for a previous attempt.
Your webhook endpoint should respond quickly (ideally within a few seconds).
Once you have validated and stored the event, respond with a success status to prevent Razorpay from retrying.
If you have complex logic to perform on successful payment, it should be done async manner by responding success message to Razorpay. This will ensure that Razorpay will not attempt retry.
Before moving to production, follow this checklist:
A well-tested webhook setup is the foundation of reliable payment reconciliation.
A robust Razorpay integration involves three layers of control:
Together, these layers form a secure and traceable payment pipeline where every transaction is validated, captured, and reconciled.
Integrating Razorpay correctly isn’t just about making payments work — it’s about building a secure, compliant, and resilient transaction system.
In short, success in payment integration lies in treating the server as the source of truth and webhooks as the voice of Razorpay.
By adhering to these best practices, you ensure every transaction your users make is not only successful — but also trustworthy.
 Raj Vasaniya
Raj Vasaniya is an AI Engineer at NextGenSoft, specializing in building intelligent, scalable, and enterprise-grade AI solutions. His expertise spans Generative AI, Large Language Models (LLMs), Retrieval-Augmented Generation (RAG), AI agents, prompt engineering, and custom AI application development.
We’re ISO/IEC 27001:2022 certified, ensuring your projects are executed with globally recognized security standards.
INDIA